Ta da! It's another craft post! After I taught you how to make the amazing free ribbon holder thing-y I decided I should show you how to make something that uses ribbon from the ribbon thing-y.
But you can make this craft regardless of whether or not you made one. If you didn't, though, I'm saddened by the damage you might have personally inflicted upon our environment by throwing one of those plastic zip-case things in the trash. But hey, I'm not one to guilt someone just because they are single-handedly contributing to global warming...or something.
Sigh.
But, I digress.
Here is what you need to make this very, very cute craft idea. Before I tell you, though, I need to say that my cousin, Allie, made these at a card class she had here when she visited. I first thought to claim it as an original idea so you would be really impressed and ooh and aah over my creativeness, but alas I cannot tell a lie. (and the fact that she reads this blog might influence that honesty as well)
OK, enough blathering. Onto the official list of things needed.
l. Paper printed with something relevant to the holiday you are making these for
2. Something cute to stick onto the paper printed in something relevant to the holiday you are making these for
3. A make-up pad and some kind of brown stamp pad (you may or may not want to use this, though)
4. Ribbon from your little ribbon thing-y (don't worry, no more guilt is forthcoming)
5. A hole punch (if you don't have one use the point of a pencil)
6. Adhesive (I used both fancy skinny adhesive and double-stick tape but use what you have)
7. A paper cutter (or scissors if you don't have one)
8. A nifty skor-it thing, or a bone folder, or your fingers
9. A package of eclipse gum
OK, you think I'm making this up, don't you? But seriously this is a craft. Please don't make fun of me. I'm trying to show you something.
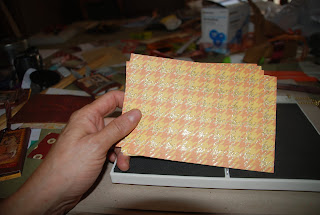
Step number 1. Cut your paper into rectangles that are 5 3/4 X 4 inches. I used embossed with glitter for some and it didn't work very well. I would just use plain printed paper.

Step number 2. Use your fancy little folder thing (honestly, don't be impressed. I only have this because my Cousin felt sorry for my pathetic paper crafting tools and gave it to me.) This would work equally well with a bone folder. Put creases in the rectangle at 1/4 and 2 3/4 inch in from each edge. There will be four folds in your rectangle of paper. Don't get confused. Just click on the picture and it will make it big enough so you can see what the heck I'm talking about.

 3. Set this paper aside and get out whatever you want to put on your folder paper for decoration. I am using a little process called "dirtying" where you put a little brown stuff on a make-up pad from your brown stamp pad. Then you kind of run it around the edges of your paper (and I did it all over the top, too) But you do not have to do this step at all. I just liked the look of it for this particular decoration.
 4. Now use your double-stick tape or a tape runner and attach your little decoration to the front of the folder paper.
  5. Breathe. You are getting tense. This is supposed to be fun. The first time is the most confusing. After I made 20 of these I was no longer confused. Breathe again. And on we go.
6. Take your skinny little tape (or cut some of your double-stick tape in half) and stick it to one of the little edges ON THE GOOD SIDE OF THE PAPER. (sorry I shouted but I kept screwing this up)
 7. Now stick it all together into a rectangle. Ta da! Craft is over. Isn't this cute? Just kidding. We have a few more steps still.
 8. Use a hole punch and punch a hole in the middle of the narrow side slightly in from the edge. Punch through both sides of the paper at the same time. (I lied, I don't think you can do this step without a hole punch) I just didn't want you to get nervous about this hi-tech equipment!
 9. Are you OK? We're almost done. Now take a piece of ribbon that is 15" long and thread it through both punched holes.
10. Now take the Eclipse gum out of it's little paper sleeve and slide it into the new sleeve. The ribbon should hit right in the middle of the gum. Push the gum all the way until it fits in there perfectly.


11. After the gum is inserted all the way into the pretty paper rectangle tie the ribbon into a knot. You cannot tie it into a bow. My Cousin told me this and I thought she was lying but she wasn't. You have to tie it into a knot so it will work correctly.
 12. Now just pull gently up on the knot and the gum will slide right out of the pretty little sleeve. Push down on the knot and it will go back in. I'm not sure how or why this works but I think it is darned cute.

And you can put like a dollar or five dollars or whatever inside and when they pull up the gum - ta da! - there is a little surprise!
I'm not sure if anyone really NEEDS a cute little eclipse gum holder but I think they are really sweet.
And I making them up to send to little kids and to give to my neighbors kids.
Do this for any holiday as a cute way to give money or just as a cute little way to send a greeting. You could write your message on the back and put it in an envelope.
Here's some more I made. You can click on the picture and see them individually better if you want to. Go ahead. Click. You will be impressed.
 Do you like them?
 I hope so.
I am exhausted from this post.
So I need to go take a rest now.
Do you need a piece of gum? I have plenty!
Sigh...


13 comments:
Very cute! Thanks for sharing!
Great job!!!! I should have told you I have this already on a "how to" sheet, you could have just copied it. snickering BUT it's not as cute as your posting!
And where is your cropadile? I do't see it on your table!!!! Need another class?
Too cute! I love it!
Waaaaaay cute!! You crack me up Jenny! :o) Your talents floweth over.
That is really neat!! I am gonna have to read the directionas a few times but think I will definitely do that!!
Sorry I haven't told you about the button things...Here is what you do:
1.Copy the code under my button (it is long so make sure you scroll all the way to the bottom with it.
2. Paste into the HTML gadget on your sidebar.
3. Save an that should be it.
The DIY Show Off image I put on my previous post is just an image I saved and inserted in my post. Then I turned it into a link by clicking on it then on the link button (looks like a paperclip going around the world?) and entering her URL in that box. All of that done as I was composing the post.
Hope that helps a little?? YOu can certainly go ahead and link up your TWOC stuff without the button!!
Jenny, that is such a clever idea!!! I might have to try this!!
Thanks for stopping by, for your sweet comment and fabric idea, and for following me! I signed up to follow you to!
Take Care!
Hi Jenny
I love these! Your instructions are great although I have to admit I would probably need to have someone show me step by step and help me the first time as I'm craft challenged..can you come over and do that? :-)
PS: I didn't want to click on your photos because I like the music that was playing too much...but I did look at the last one!
I love this, what a great idea for the "extra" teachers at my girls schools. We always get something for the teacher helpers, lunch room monitor, etc. this will be perfect. Thanks for sharing this!
That last line is the BEST!
You are too cute.
AHHHHHHH I could die those are so cute!!! and man have I missed your wit and overall cuteness...the pennies on the bar were inset and there was a glass top over them that was sealed along the edges btw!!!
you totally amaze me. This was a great tutorial (could never figure out how to post this stuff) It is exactlly what I need to do these and they are going to be for Christmas. Where do you get your old fashioned pictures?
rob
I stand corrected!! Cute idea! I love the halloween image you used and was saddened when I reached the bottom, and no where to be found was the source for it.
Post a Comment